
I made my own Baby K'tan type carrier!
This carrier is the perfect mix of comfortable, quick to put on, and easy to stash in your bag. If you like your Moby or Boba, you will LOVE this. It is a lot less fabric than the Moby, so you won't get too warm. The only drawback is that you need to have a specific size just for you--you'll have to buy another carrier if your child's other caregivers wear a different size. Hopefully the good people at Baby K'tan will not be upset with me for sharing this.
I've included tying instructional photos below.
I used these instructions from someone else who made one. I've added my own notes in purple.
You'll need: fabric and matching thread, sewing machine, scissors or rotary cutter, and an iron.
You'll also need: either 2 large rings (if you want a ring sling type sash), or an extra piece of fabric if you want to tie your sash on with a knot.
Here's what I did:
1. Using a soft measuring tape, measure from the tip of your shoulder to your side just under your ribs. Double this measurement and add 2" for a seam and 2" for shrinkage.This is the length of fabric you need to buy. (My measurement was 21". So 21 x 2 = 42". Then add 42 + 2 + 2 = for a final measurement of 46") Note a change to my instructions here: buy approximately 9 ft (3 yds) if you want to make your sash from a solid piece of fabric. Then, you can simply cut your loop pieces to the correct length.
2. Go to Joanns/Hancocks and buy a stretchy fabric of your choice. Don't go for 100% polyester unless you want to be really hot really fast. Also, don't buy something that's super stretchy. You want almost no stretch along the length and a moderate amount of stretch across the fabric. I love their 60% cotton/40% polyester interlock. Go for something that's 60" across too. This will give you enough for the two rings and the support sash.
3. Cut into 3 - 20" pieces along the length. You should end up with three pieces of fabric 20" wide (stretchy) and your measurement from #1 long (non-stretchy). You will have a scrap piece if you bought 3 yards for making the long sash. Prewash (and tumble dry!)

4. Take one piece and sew it together along the short ends with a French seam (gonna have to look that one up, don't have the room to explain it). Repeat with a second piece. The loops are done (unless you want to hem the sides- I didn't). I didn't make the smaller connecting loop because the ktan is actually easier to use without it. Go see babyktan.com to see the smaller loop. She's right, you don't need it.
5. Now the support sash. This uses the third piece. It isn't going to be long enough to tie in the back, so you need to either sew on some fabric to the ends to extend it enough to tie (I used a piece of an old Tshirt in a different color for an accent color. I cut the pieces so my accent fabric would be in the center.) or do what I did: Buy two rings like you would use for a ring sling and sew them onto one end (just like for a ring sling). You use it just like normal except that instead of tying in the back, you thread the free end into the rings like a ring sling.
I want to add an additional note regarding the sash: In the photos you see my sash tied in the back, but it will stay put much better if you make the sash longer---long enough to criss-cross in the back, bring it around to the front, and then tie it at your belly. That is why I have give the measurement of approximately 9 ft (3 yds) long to fit most.
6. Download the instructions and start wrapping.
Here's what I did:
1. Using a soft measuring tape, measure from the tip of your shoulder to your side just under your ribs. Double this measurement and add 2" for a seam and 2" for shrinkage.
2. Go to Joanns/Hancocks and buy a stretchy fabric of your choice. Don't go for 100% polyester unless you want to be really hot really fast. Also, don't buy something that's super stretchy. You want almost no stretch along the length and a moderate amount of stretch across the fabric. I love their 60% cotton/40% polyester interlock. Go for something that's 60" across too. This will give you enough for the two rings and the support sash.
3. Cut into 3 - 20" pieces along the length. You should end up with three pieces of fabric 20" wide (stretchy) and your measurement from #1 long (non-stretchy). You will have a scrap piece if you bought 3 yards for making the long sash. Prewash (and tumble dry!)
4. Take one piece and sew it together along the short ends with a French seam (gonna have to look that one up, don't have the room to explain it). Repeat with a second piece. The loops are done (unless you want to hem the sides- I didn't). I didn't make the smaller connecting loop because the ktan is actually easier to use without it. Go see babyktan.com to see the smaller loop. She's right, you don't need it.
5. Now the support sash. This uses the third piece. It isn't going to be long enough to tie in the back, so you need to either sew on some fabric to the ends to extend it enough to tie (I used a piece of an old Tshirt in a different color for an accent color. I cut the pieces so my accent fabric would be in the center.) or do what I did: Buy two rings like you would use for a ring sling and sew them onto one end (just like for a ring sling). You use it just like normal except that instead of tying in the back, you thread the free end into the rings like a ring sling.
I want to add an additional note regarding the sash: In the photos you see my sash tied in the back, but it will stay put much better if you make the sash longer---long enough to criss-cross in the back, bring it around to the front, and then tie it at your belly. That is why I have give the measurement of approximately 9 ft (3 yds) long to fit most.
6. Download the instructions and start wrapping.
I
love, love, love this sling. I started with a pouch (hell on the
shoulders), a ring sling (ditto on the shoulders) and then wraps
(loooooved, but too much time). This sling works just like a wrap,
but without the tying.
Note: I don't know how long you can use
this wrap. I carried my 1 year old nephew in the front carry position
and it worked really well, but I don't think the cradle or kangaroo
would work at all with the stretch of the fabric. I think a lot
depends on whether your fabric stretches along the length. If it
does, then the wrap will really sag with a heavy baby.
---------------------------------------------
I have been using this carrier with my large 11-month old, and it works great!

Here is my French Seam. I used a 3/8" seam allowance, followed by a 5/8" seam allowance.
I flattened it down and stitched a third time to hold the little flap down.

Here are my two loops of fabric.

Slip one loop over your head, and let it rest around your hips.
Slip the other loop over your head and diagonally across your upper body.
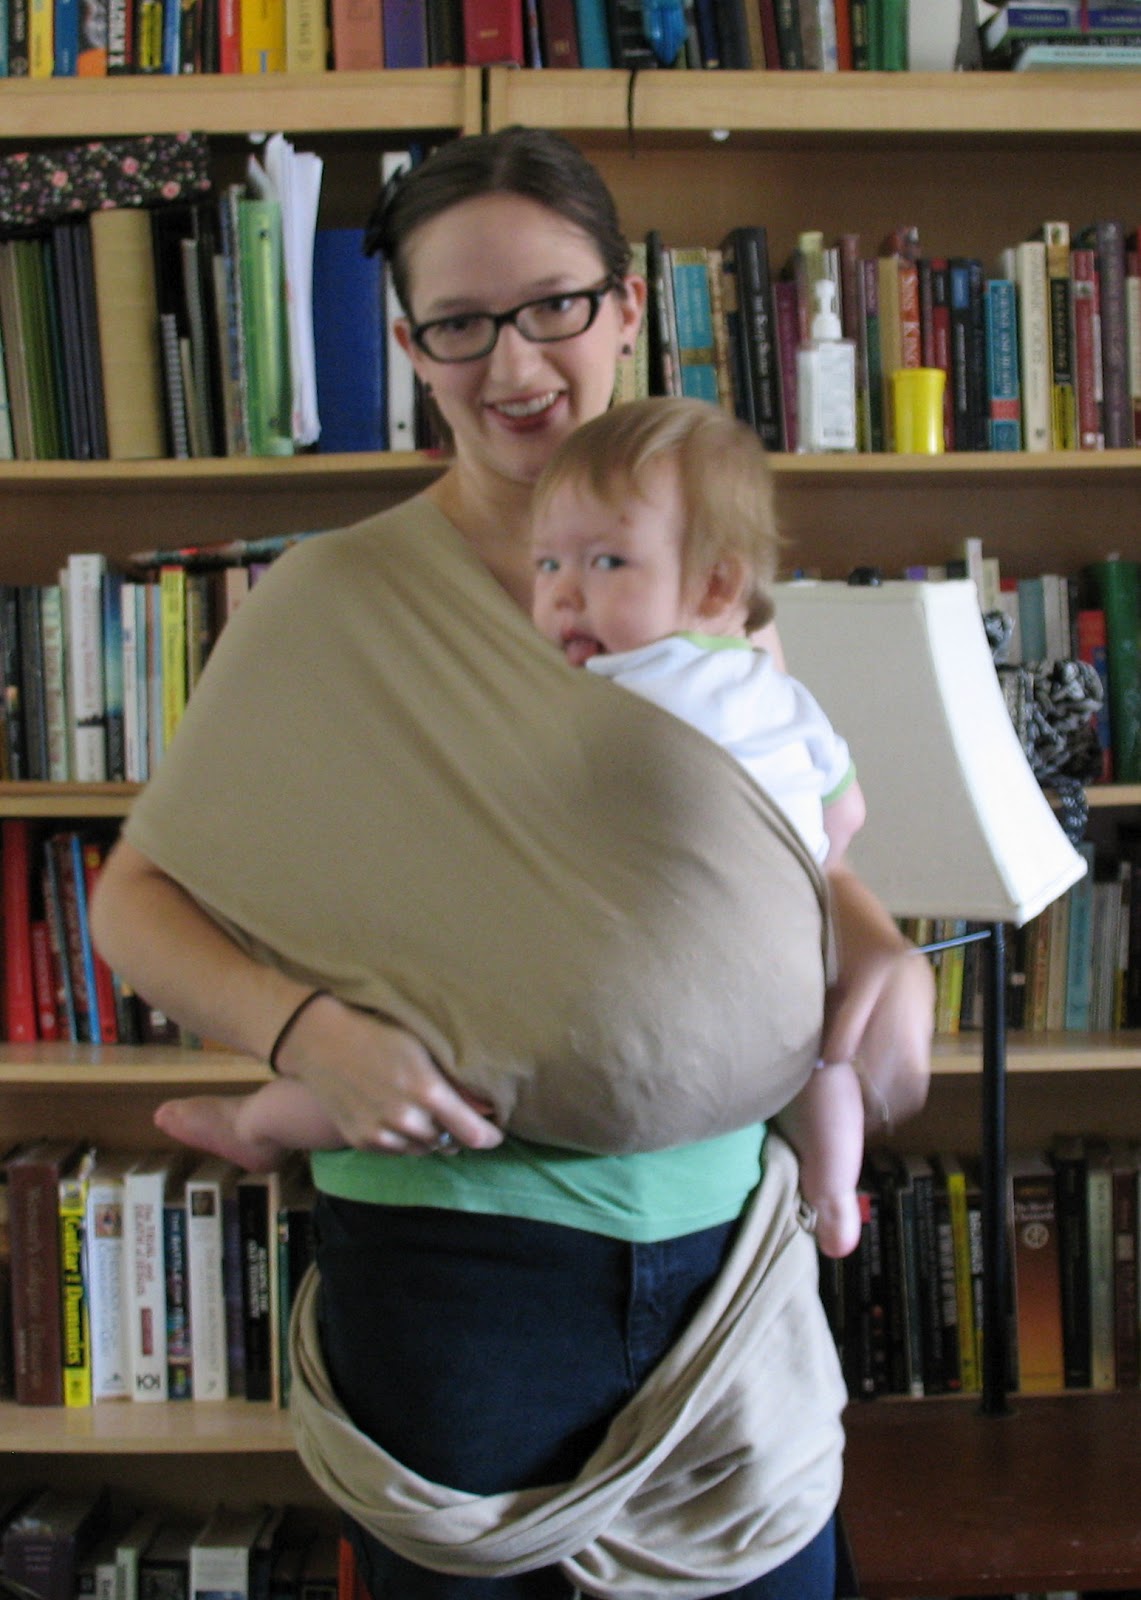
Put your baby in, and spread the fabric across her body.
She should be in a seated position--her knees should be at the same level as her hips.

Pull the other loop up from your waist to between your baby's legs. Pull it up onto your shoulder.
The two loops will now make an X across your back. Spread the fabric across your baby's body.
Note: if you have a very young baby, you do not need to put the fabric between her legs.
One option at this point: you may choose to shift the whole carrier and baby over to one hip.

Here's my sash! You could also use a scarf if you have a very large, sturdy one.

Spread it around your baby's back.
If you make yours long enough, you'll be able to criss-cross it in back, then bring it around to tie in front.

Oops, mine is too short. I just tie mine in the back.

Here's the X on my back. You can see how it spreads the pressure across your whole body, so it won't be digging into your shoulders.

And we're done!
Your baby's body should be above your belly button. You should be able to kiss your baby's head.

You may also choose to bunch the fabric up on your shoulders. Whatever is comfy for you.
You may even be able to breastfeed your baby without taking her out of the carrier.
Enjoy!
I look forward to your comments.
12 comments:
Thank you so much! Very helpful
Thanks for the directions and pics! I've used ring slings, Ergo, Moby wrap, pouch sling and Mei Tai. I'm exited to try something new with baby #5. :)
I just found your carrier when looking around on Pinterest. I plan on hitting the fabric store this weekend, and hopefully getting a great deal to make my own baby k'tan style carrier. Thank you so much for the tutorial and all of the photos of the finished product.
My granddaughter is due in October. I am going to the store tonight for fabric! Thanks for the great enhanced directions, and the pictures
,
made it while 3 mths prego and tried it on big bro who had just turned 2 at the time so it was kind of tight... just waiting to try it out when new bro is born... hopefully it wont feel so tight with a smaller baby.. if not i have extra fabric. it's sooooooo easy to make that it doesn't matter if i need to make another one...
I do a no sew version using t shirts. found it here.http://schamelot.blogspot.com/2012/05/no-sew-baby-ktan-wrap-style-carrier.html
I know this is old, but I am wondering how or if a 45" width of material would work. This would leave each strip only 15" instead of the full 20"..... Would that be too narrow?
You should probably clarify that the measurement in #1 is ACROSS your body, not just on one side. At least I think that's where I screwed up...because my measurement was 14". The resulting loop I can't even get over my head and one arm...
Your website is really cool and this is a great inspiring article.
baby carriers for hiking
What is the point of washing the fabric after you cut it? I can understand before you cut it but Then I wouldn't think you'd need the extra 2 inches for shrinkage. I'm just a little confused about this step.
Instead of the final sash, I use a pregnancy belly band. This is not the cotton shirt extender, buT the synthetic super stretchy one.
What’s the website
Post a Comment