Friday, October 11, 2013

Will a Britax Roundabout 55 fit in my 2009 Honda Fit?

Short answer: Yes!

Now for a brief review of the Britax Roundabout 55.

After wrestling & fighting with our current convertible child restraint (an Alpha Omega Elite I bought in 2009) and scraping up my hands every time to install it with the vehicle seat belt (the LATCH anchors no longer maintained tension), I broke down and decided we need a new car seat for my daughter. If it can't be installed properly, don't use it.

I looked at reviews online (mainly on Amazon) and took advice from friends. I narrowed it down to these three: Graco MyRide 65, Chicco NextFit, or Britax Roundabout 55. I ended up picking the Roundabout, because there wasn't anything in the consumer reviews about it not fitting in a smaller vehicle. Even though we're thinking about getting a bigger car, I wanted to be absolutely certain I would have no trouble at all getting this in our current car or in a friend's car when we travel. Other key factors were: desired to keep my 2 yr old rear-facing, brand trustworthiness, price, styling, height/weight fit, ease-of-installation, and type of anchor mechanism.

The Britax arrived in the mail today, and installation was a breeze compared to our old Alpha Omega. I'm very satisfied. My daughter couldn't wait to get in and try it out. With the Roundabout rear-facing, I can actually move the front seat aaaaall the way back without interfering with the child restraint! Before, we had to move it up so there was only just enough room for an adult to sit up front.


 The LATCH anchor mechanisms are the type with a button up top, so I don't have to dig to depress the anchor.


See that metal bar under the shell of the seat? 
This seat has a bar upon which the LATCH tethers simply slide up/down, 
so when it's time to switch to forward-facing, I won't have to re-thread the belt path.


 Here it is: all installed in our '09 Honda Fit! It will work great, even  with my 6' 2" husband in the front seat. I hope this seat works out for us, because it's SO much easier to use!
(P.S. It comes in different colors, too!
P.P.S. Made in the USA!)

Thursday, October 10, 2013

Upcycling a Crib into a Light (Tracing) Table

This crib/toddler bed was picked up at a garage sale for $5. We got our use out of it, then I was able to turn it into a light table for tracing, as well a place to stash my paper. I do a lot of tracing for craft projects, so this was a great way for me to keep an old crib out of the landfill a while longer (and save a bunch of money with not having to purchase a light table from an art supply dealer). 
If you're handy, you can make one, too!
 I cut one of the side rails in half. I made it into a pyramid shape. You could staple canvas or almost any sturdy material here, or use real hinges.

 Once my straps were on, I adjusted the length so it would stand at just the right height.
 Here it is with the pads of sketch paper. 
This could be fitted with tiny hooks or pegs to hold ribbon, thread, bobbins, 
or even mounted to the wall.

 I put an old TV tray under the glass to hold my lamp, but you could come up with infinite possibilities and types of lighting solutions.
 Using pliers to bend the hook parts, I removed the "springs" from the old bed spring; I found a piece of glass the right size and cut a piece of wood to fit into the frame of the bed spring. 
I mounted it at and angle with screws and wire ties for a temporary fix, 
but with the right hardware, it could be made to be adjustable to any height/angle.
 I love using this, and it cost me pretty much $0!

Wednesday, June 26, 2013

Nature Shelf for Kids

I keep learning so much about the importance of letting kids run around outdoors and be creative.
To encourage outdoor exploration for my preschooler, I hung up a "nature shelf" of his very own.
Ours is made from reclaimed wood with a couple of brackets to attach it to the wall. I also added a mirror above it just for fun (which is an old medicine cabinet door turned on it's side).
Now we have a place to put his little objects. He loves finding interesting little things in the back yard to display!


Friday, June 14, 2013

DIY Modular Spice Rack

I've found so many uses for food boxes. This is my quick, easy storage solution that cost me absolutely nothing. I needed to clear some counter space in my kitchen. I had been storing my spices in a 3-drawer plastic bin intended for scrapbook paper. Since we won't be staying in this apartment for very much longer, I needed an inexpensive, temporary solution to clear clutter off the countertops. We're always thinking of ways to reuse and upcycle at our house..


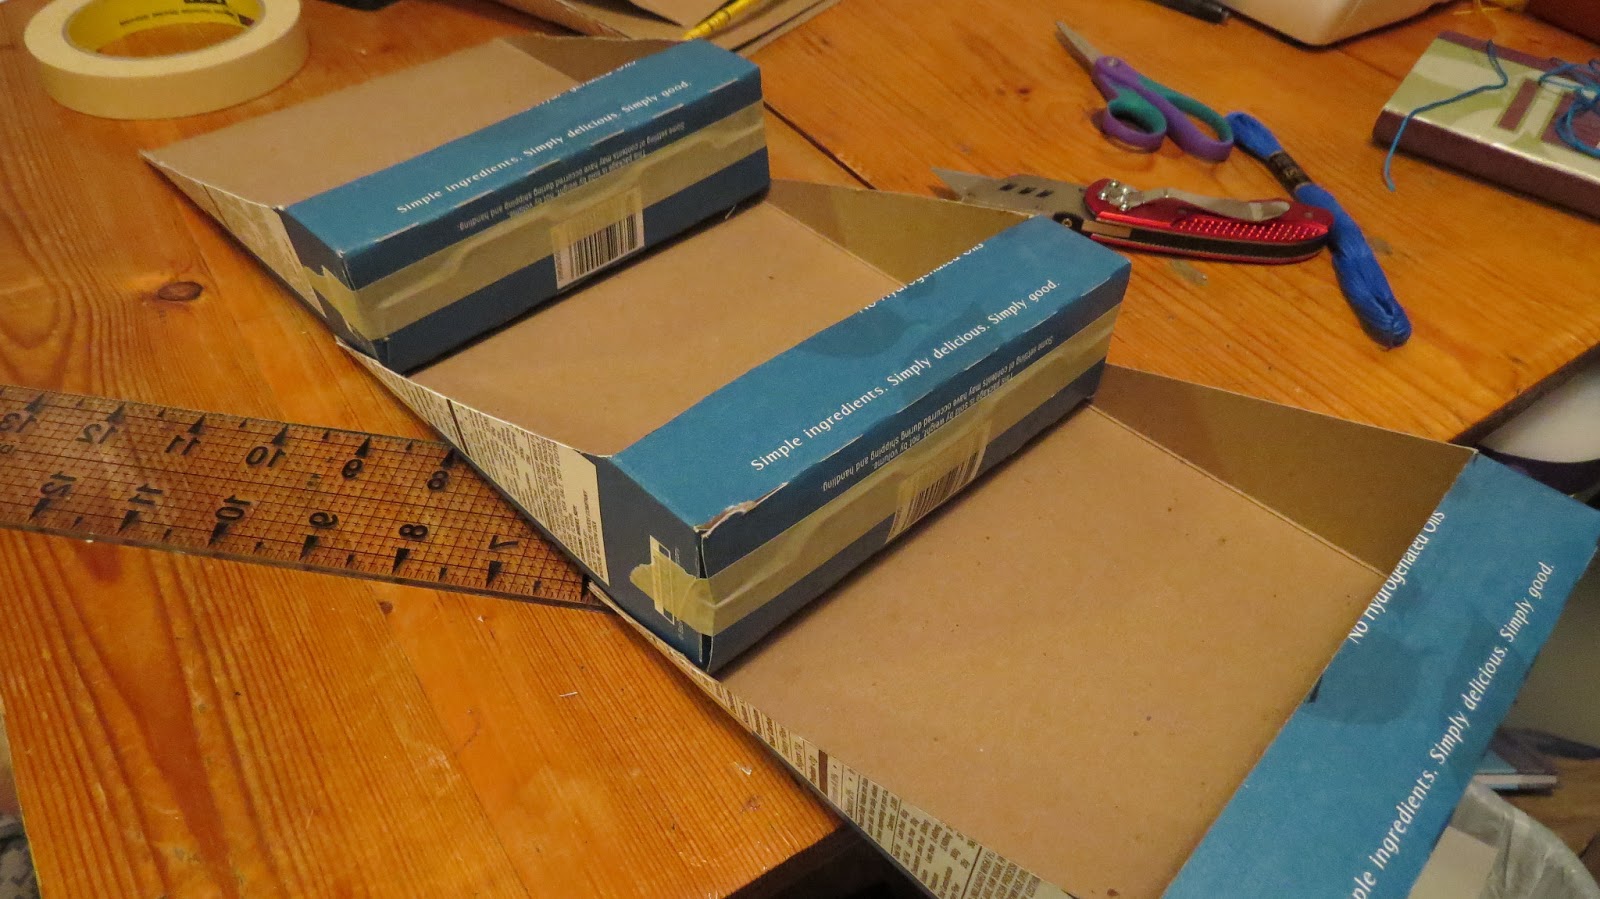
I taped the bottom of a cookie box shut.
  I measured 1 1/4 inch from the bottom of the box, and used a knife to carefully cut a slit  in the box. (I chose 1 1/4 inches, because that seemed about just the right amount to still be able to read the labels on the spice containers)
 I used a straight edge to mark a line at an angle from my slit toward the opposite corner on the top of the box.
 I carefully cut along that line, using my knife.
 I folded the flap at the top of the box backward, and taped it down. This would give me a double thickness through which to nail the top edge of the box to the wall.
 Deciding how I want to arrange my boxes on the wall...
 Then, I used a couple of finishing tacks to mount my new spice rack to the wall. Done!
Totally customizable, and absolutely free. You could also nail them to the inside of a cabinet door, so they're out of sight. The boxes could easily be spray painted or covered with decorative paper to pretty them up a little. This concept could work with almost any box and could be used for infinite possibilities. Use a cereal box for children's books, a small box for pens etc...

...And a great way to avoid throwing something in the trash if recycling isn't available for these types of containers in your area.

If you've used these in a fun way in your home, please share your ideas or photos with me!

Monday, October 01, 2012

Adelynn's Birthday

Today is my daughter’s first birthday. There’s so much I want to say about this day, I don’t even know where to begin!
I don’t think I am exaggerating when I say that I have reflected on the day she was born every single day for the past year. It forever changed the way I think about myself and what my body is capable of. More than anything, it changed my relationship with my Creator. God answered so many specific prayers in very specific ways on that day. With the exception of the day I decided to follow Christ and my wedding day, Adelynn’s birthday was the most important day of my life so far. I cried tears of joy for two weeks after the fact!
For those that are curious to read about it, I posted the (rather lengthy) story here.
           My son’s birth was not the experience I’d hoped for, so I felt pretty unsure about going through childbirth the second time. Calling it “amazing” would be an understatement. Because of the way Adelynn’s birth went, I know I could do it again and again. And it has spurred a passion in me to help other mom’s achieve a positive birth experience. I’ve decided to devote myself to the cause through education and one-on-one support with expectant couples--and now it’s something I can really see myself doing for the rest of my life! (So, you can see why I say my daughter’s birth changed my life!)
    Happy Birthday, my sweet little girl. May your birth-day be a sign of what the rest of your life will be -- giving other people stronger faith in Jesus Christ. I love you, Adelynn!

Saturday, September 08, 2012

Why Do Women Care How Other Women Birth Their Babies?

On Sept. 4, 2012 Birth Without Fear posed the question: "Why do women care how other women give birth? Genuine Question." 

I noted that just an hour later, more than 100 facebookers had posted responses. Answers varied wildly, ranging anywhere from, "I don't care; it's nobody's business." to "It's in our nature to care about others--that's just being human." (which was my husband's sentiment).

So Marcia, why are you such a birth nut? I think my feelings would be best expressed in the form of an interpretive dance. But, since I don't have time for that today, let it suffice to say that I think God just made me this way (?)

A few initial thoughts...

What I've found is that most women want to have a safe, happy birth experience, they're just misinformed. I just want people to be as informed as possible, so that they can make the best, safest choice for their family. How can we make safe birth choices if we don't even know about all our options? If we don't know our options, we don't have any. The decisions that are made on that day affect us and our baby's health for the rest of our lives. Birth is unpredictable, but parents can make a plan for the controllable parts, as well as decide in advance for different possible scenarios. We can educate ourselves so that even if something undesirable happens, we can look back with no regrets.
Giving birth is a rite of passage. It's a day that is forever etched in a parent's memory. It can be incredibly powerful, or cripplingly traumatic (or somewhere in between, but we try to shoot for better rather than worse).

We don't have to hand our rite of passage over to a care provider out of fear (or, heaven forbid, laziness). The way birth is portrayed on TV shows and in movies is all wrong. Don't be fooled by it.

We need to educate ourselves about REAL birth for the sake of our babies' safety. (Plus, it will make birth a lot easier and less painful if you know what you're going into & how to cope!)

I strongly encourage moms to: carefully select your birthing place, carefully select your prenatal care provider, and educate yourself as much as possible. You wouldn't have your wisdom teeth removed without carefully weighing the risks/benefits, and you wouldn't let just anyone perform the surgery. This concept is also true--even more so--for the birth of your baby.


So, yes, I do care how other moms birth their babies. For pregnant moms: I genuinely want them to have a positive experience and healthy babies. For moms who've been through it: sharing our past experiences is how we learn. I learned a LOT from my first birth that helped make my second birth and amazing, beautiful experience. 

That is why I am working toward becoming a childbirth educator. We are all in this together.

I look forward to your comments!

Friday, September 07, 2012

Homemade Baby K'tan Carrier Instructions

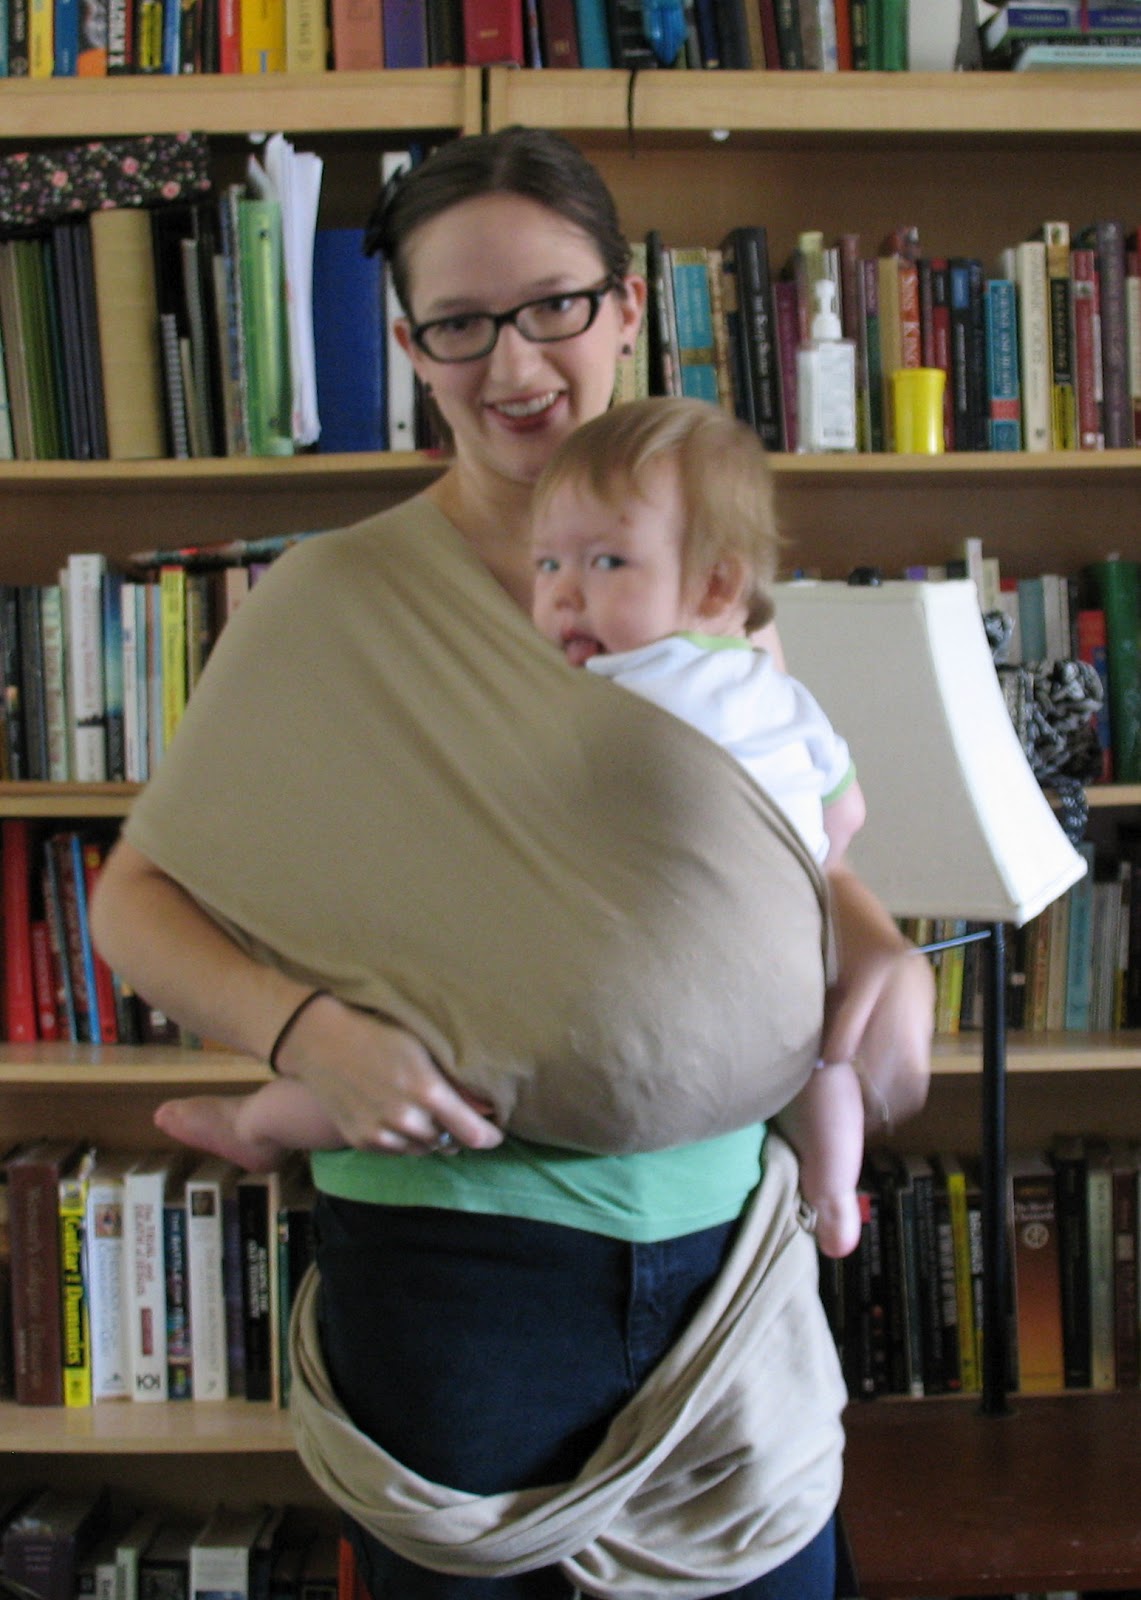
I made my own Baby K'tan type carrier!

This carrier is the perfect mix of comfortable, quick to put on, and easy to stash in your bag. If you like your Moby or Boba, you will LOVE this. It is a lot less fabric than the Moby, so you won't get too warm. The only drawback is that you need to have a specific size just for you--you'll have to buy another carrier if your child's other caregivers wear a different size. Hopefully the good people at Baby K'tan will not be upset with me for sharing this. 
I've included tying instructional photos below.

I used these instructions from someone else who made one. I've added my own notes in purple.

You'll need: fabric and matching thread, sewing machine, scissors or rotary cutter, and an iron.
You'll also need: either 2 large rings (if you want a ring sling type sash), or an extra piece of fabric if you want to tie your sash on with a knot.
Here's what I did:
1. Using a soft measuring tape, measure from the tip of your shoulder to your side just under your ribs. Double this measurement and add 2" for a seam and 2" for shrinkage. This is the length of fabric you need to buy. (My measurement was 21". So 21 x 2 = 42". Then add 42 + 2 + 2 = for a final measurement of 46")
Note a change to my instructions here: buy approximately 9 ft (3 yds) if you want to make your sash from a solid piece of fabric. Then, you can simply cut your loop pieces to the correct length.
2. Go to Joanns/Hancocks and buy a stretchy fabric of your choice. Don't go for 100% polyester unless you want to be really hot really fast. Also, don't buy something that's super stretchy. You want almost no stretch along the length and a moderate amount of stretch across the fabric. I love their 60% cotton/40% polyester interlock. Go for something that's 60" across too. This will give you enough for the two rings and the support sash.
3. Cut into 3 - 20" pieces along the length. You should end up with three pieces of fabric 20" wide (stretchy) and your measurement from #1 long (non-stretchy). You will have a scrap piece if you bought 3 yards for making the long sash. Prewash (and tumble dry!)


4. Take one piece and sew it together along the short ends with a French seam (gonna have to look that one up, don't have the room to explain it). Repeat with a second piece. The loops are done (unless you want to hem the sides- I didn't). I didn't make the smaller connecting loop because the ktan is actually easier to use without it. Go see babyktan.com to see the smaller loop. She's right, you don't need it.
5. Now the support sash. This uses the third piece. It isn't going to be long enough to tie in the back, so you need to either sew on some fabric to the ends to extend it enough to tie (I used a piece of an old Tshirt in a different color for an accent color. I cut the pieces so my accent fabric would be in the center.) or do what I did: Buy two rings like you would use for a ring sling and sew them onto one end (just like for a ring sling). You use it just like normal except that instead of tying in the back, you thread the free end into the rings like a ring sling.
I want to add an additional note regarding the sash: In the photos you see my sash tied in the back, but it will stay put much better if you make the sash longer---long enough to criss-cross in the back, bring it around to the front, and then tie it at your belly. That is why I have give the measurement of approximately 9 ft (3 yds) long to fit most.
6. Download the instructions and start wrapping.
I love, love, love this sling. I started with a pouch (hell on the shoulders), a ring sling (ditto on the shoulders) and then wraps (loooooved, but too much time). This sling works just like a wrap, but without the tying.
Note: I don't know how long you can use this wrap. I carried my 1 year old nephew in the front carry position and it worked really well, but I don't think the cradle or kangaroo would work at all with the stretch of the fabric. I think a lot depends on whether your fabric stretches along the length. If it does, then the wrap will really sag with a heavy baby.
---------------------------------------------
I have been using this carrier with my large 11-month old, and it works great!
 Here is my French Seam. I used a 3/8" seam allowance, followed by a 5/8" seam allowance. 
I flattened it down and stitched a third time to hold the little flap down.

 Here are my two loops of fabric.

 Slip one loop over your head, and let it rest around your hips. 
Slip the other loop over your head and diagonally across your upper body.

 Put your baby in, and spread the fabric across her body. 
She should be in a seated position--her knees should be at the same level as her hips.

 Pull the other loop up from your waist to between your baby's legs. Pull it up onto your shoulder.
The two loops will now make an X across your back. Spread the fabric across your baby's body.
Note: if you have a very young baby, you do not need to put the fabric between her legs.
One option at this point: you may choose to shift the whole carrier and baby over to one hip.

 Here's my sash! You could also use a scarf if you have a very large, sturdy one.

 Spread it around your baby's back. 
If you make yours long enough, you'll be able to criss-cross it in back, then bring it around to tie in front.

 Oops, mine is too short. I just tie mine in the back.

 Here's the X on my back. You can see how it spreads the pressure across your whole body, so it won't be digging into your shoulders.

 And we're done!
Your baby's body should be above your belly button. You should be able to kiss your baby's head.

You may also choose to bunch the fabric up on your shoulders. Whatever is comfy for you.
You may even be able to breastfeed your baby without taking her out of the carrier.
Enjoy!
I look forward to your comments.

Tuesday, May 29, 2012

Certified Childbirth Educator

It's pretty much been decided at this point, so might as well share: I'm pursuing my certification as a childbirth educator with (drum roll please) ...CAPPA
(Childbirth and Postpartum Professional Association).

-----------------------
The CAPPA Vision:
Imagine a world…
Where women are encouraged to trust their bodies. Where myths about pregnancy, childbirth, the postpartum period, and breastfeeding are dispelled.

Imagine a world…
Where women are given the tools they need to make informed decisions about their pregnancy, childbirth, postpartum, and breastfeeding experiences.

Imagine a world…
Where education does not use guilt as a motivator but instead encourages families to make intuitive and informed decisions.

Imagine a world…
Where women are surrounded by caring, compassionate support throughout the perinatal period.

Imagine a world…
Where families are equipped to embrace parenthood with confidence.

Imagine a world…
Where there is mutual respect amongst support professionals and medical professionals, all working together as colleagues to give the best care for families.

Imagine an organization …
That strives every day to make this world a reality.
-----------------------

I've already read some of the required reading, but will have to read 4 books, plus the CAPPA educator course material and the HUG Your Baby series, plus pay some fees, organize my curriculum and business legal stuff etc. ...and then I will be all set to start helping pregnant couples!
I am SO excited!


Friday, May 25, 2012

Music for Labor

In case anyone is curious what we actually ended up using for relaxation during labor with my second baby: I tried to choose only things that put me into a relaxed trance, which is a very different set of music than what I enjoy on a daily basis.

  • Nature Sounds for Pregnancy and Birth
  • A mix playlist I created myself
I Surrender All - Jadon Lavik
Into the West - Howard Shore (Lord of The Rings)
For the Beauty of the Earth - Laura Jewel & Steve Ivey
Beyond the Veil - Clyde Bawden
For the Beauty of the Earth - The Lower Lights (yes, two versions of this song)
Consider the Lilies - Mormon Tabernacle Choir
Calling All Angels - The Wailin' Jennys
Redeemer - Darla Day
At Last - Etta James
Dream a Little Dream of Me - Michael Buble
Seascapes - Paul Brooks
I'm Yours - Jason Mraz

  • Hypnobirthing (this isn't music, but rather a spoken word CD that comes with Marie Mongan's book)
I used these during the months leading up to the birth as well as during labor. I'd encourage moms to make their own, and if you don't end up using it, you'll still have something to relax to after baby arrives!

Wednesday, May 23, 2012

My Baby Won't Nurse!


Refusal to nurse is a common problem breastfeeding moms will face with their little ones. Babies wail or fuss at the breast. They push away or arch their backs. I've encountered it dozens of times with my little ones, and it's enough to make a mom want to throw in the towel (or burp cloth) on breastfeeding. To date, I have more than 24 months of breastfeeding experience under my belt, but only because I refused to give up. Most often, waiting it out seemed to be the key. I thought I should share some of the reasons why babies may fuss at the breast:
  • Needing to burp: If baby's been nursing just fine for five minutes or so, then suddenly refuses to continue, the most common explanation is the need to burp.
  • Simply not hungry: Young babies will generally need to eat every two to four hours. If you suspect your baby might not be hungry, try again in another 30 to 60 minutes. Don't wait for your baby to become overly-hungry, though.
  • Indigestion: The foods a mother eats change the content and flavor of her milk. Babies may get some indigestion from certain foods or simply not like the flavor of the milk after mom had something spicy.
  • A cold: If your baby has a stuffy nose, she may not be able to breathe very easily when she sucks in milk. Try a little bit of baby nasal saline solution followed by a nasal bulb before nursing.
  • An ear infection or teething: If this is the case, the action of nursing can sometimes be painful for some babies. If you suspect teething, give your baby a teething toy. Wait an hour or so, and keep trying. If you suspect an ear infection, use an otoscope to check your baby's ear for redness, or see your child's pediatrician.
  • Too tired to nurse: Occasionally, babies are just too tired to want to do the work of eating. Sometimes a difficult afternoon or a busy day full of new experiences makes babies overstimulated. Put baby down to nap.
  • Distractions: A room full of other people or sounds can be distracting or overwhelming, especially for babies about six months old or older. Do your best to dim the lights and find someplace quiet for just the two of you.
  • Bowel movement: My children would refuse to nurse if they were trying to poop, no matter how hungry I thought they must be (especially as very young babies). As soon as they were done and in a fresh diaper, everything would be fine.
  • A sore shoulder or neck: There was an instance with my son when simply the act of placing him in a side-lying posture seemed to set him off. I realized I had been repeatedly holding him wrong. If you haven't been diligent about how you position your baby's spine, neck and shoulders, your baby could develop sore muscles. (Baby's ear, shoulder and hip should be aligned). Try making her as comfortable as possible, possibly placing her atop a soft pillow or nursing in a different position than usual. The problem should remedy itself in a day or so.
  • Other explanations can include colic, thrush, a food sensitivity, milk flow (too fast or slow) or hyperlactation syndrome. And sometimes babies go on a nursing strike for reasons we don't understand.

Even if you cannot determine the reason your baby won't eat, there are things you can do.
  • First and foremost, soothe your baby and wait for him to be calm before trying again. You don't want him to associate frustration with the breast.
  • Propping baby's head and torso in a more upright position. I found this to be especially effective if I could hold the baby in such a way to nurse while walking around and gently bouncing.
  • Keep trying. If you've tried a few times and aren't making progress, give it an hour. Keep trying! In the mean time, use a breast pump every two or three hours to relieve engorgement and keep your milk supply.
  • Try giving a bottle, just for one or two feedings. Sometimes babies who are refusing to nurse will take a bottle. Try breastfeeding again later in the day.
  • Call a support person: a lactation consultant, an experienced mom, a pediatrician, or just a friend who will help you relax.
If all else fails, be sure to see your doctor and don't feel guilty or ashamed if you aren't able to continue breastfeeding. You need to what's best for baby AND you.